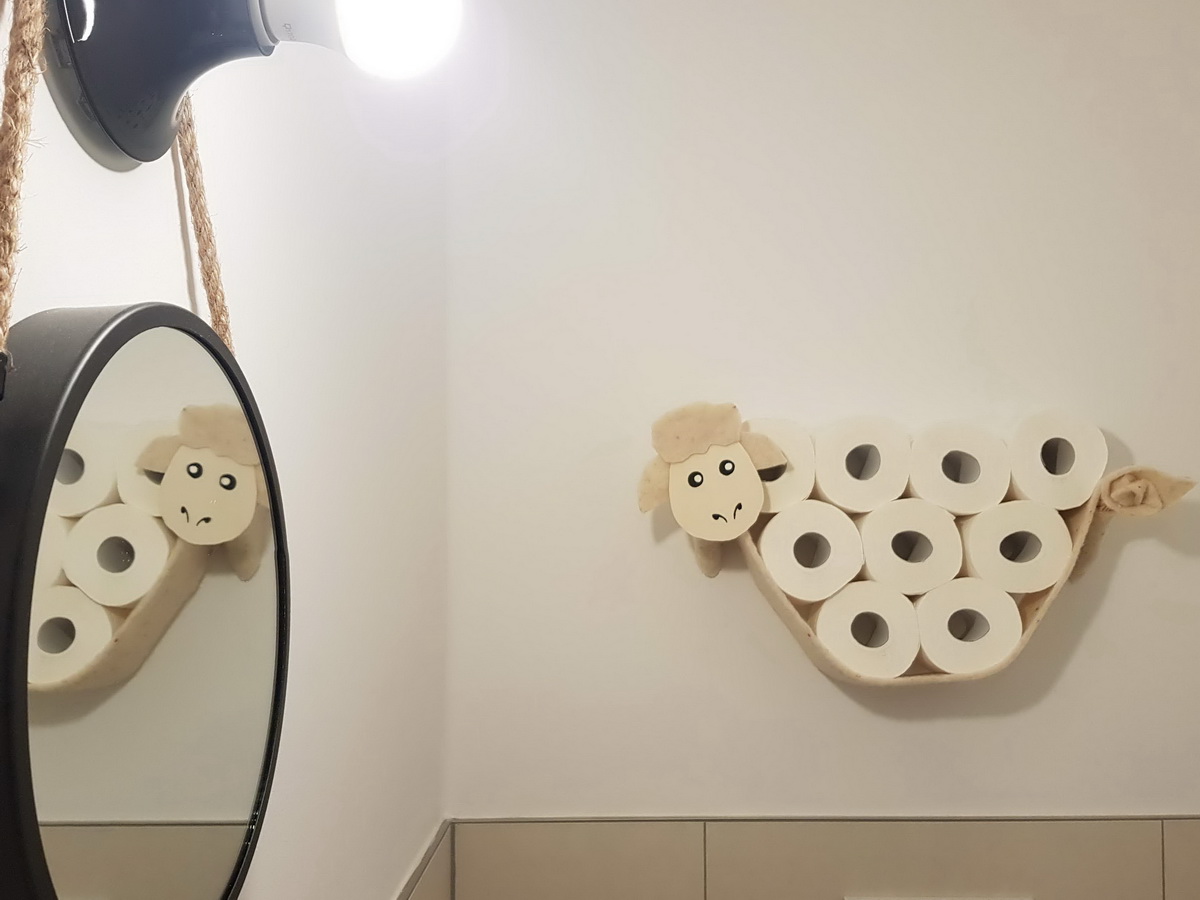
DIY project #8 is for sure the cutest. A bit ridiculous, too, but first and foremost: Cute! It’s a DIY sheep toilet roll storage. Formed like a sheep, with the face of a sheep and the woolen furry feel of a sheep. Of course it’s Pinterest-inspired, but we like it better than most things we found online. Is that pride? Definitely not: We’re just subjectively evaluating our own DIY sheep toilet roll storage against all the others out there and declare ours the winner.
DIY Sheep toilet roll storage materials & measures
Materials is super simple this time again: For the most realistic look and feel we’ll need some nonwoven. Ideally “white”, or the natural beige. Up to you, to change direction here and make it a DIY black sheep toilet roll storage 😉 In our local hardware store they sell this in various dimensions. We’ll definitely need 2 meters in length and “the size of one toilet roll” in width. Over here that’s 10 cm.
The only other material we need are:
- One piece of craft wood (which we’ll cut into the shape of our sheep’s head)
- Standard wooden shelf holders at least the length of a toilet roll again. The advantage here is, they’ll most likely have a built in attachment system at the back so you can easily hang them on two screws.
Building our Sheep toilet roll storage
Here’s the few simple steps to get that cute sheep built:
- We used this clipart of a sheep, printed it on A4, put that print on the craft wood and sawed it out.
- Still with the print lying on the craft wood: With a strong pencil (or anything strong actually) “draw” the outline of the sheep’s face. Just so there’s a little dent in the craft wood.
- Use that dent for orientation and with a permanent marker draw the sheep’s face on the craft wood.
- Cut the ears and hair of the sheep out of the edge of the nonwoven and (hot) glue it to the craft wood sheep face.


- Measure the distance in which to space the shelf holders — we did that with two chairs and real toilet rolls as weight. Because later this is gonna be how much the nonwoven will give in and hang low.
- Mark the spot and attach the nonwoven to the shelf holders. We had first used hot glue, but I didn’t trust it. Thus: I used a stapler for additional sturdiness.
- Saw off the tip of the shelf holders, to create a “plain” end.
- (Hot) glue the sheep’s face to either the right or left shelf holder, depending on where you want the sheep to look.
- The left over nonwoven on the tail end of the sheep (where you didn’t put the head) shall be rolled and glued together to create the little tail of our sheep.
- Attach the shelf holders to the wall.


Voila! Done! There’s our little sheep. Almost to good to actually use those now decorative toilet rolls. But then again: It’s good to have some toilet roll stored for emergencies 😉