Into the Renaissance – Netherlands Strategy (Deity)
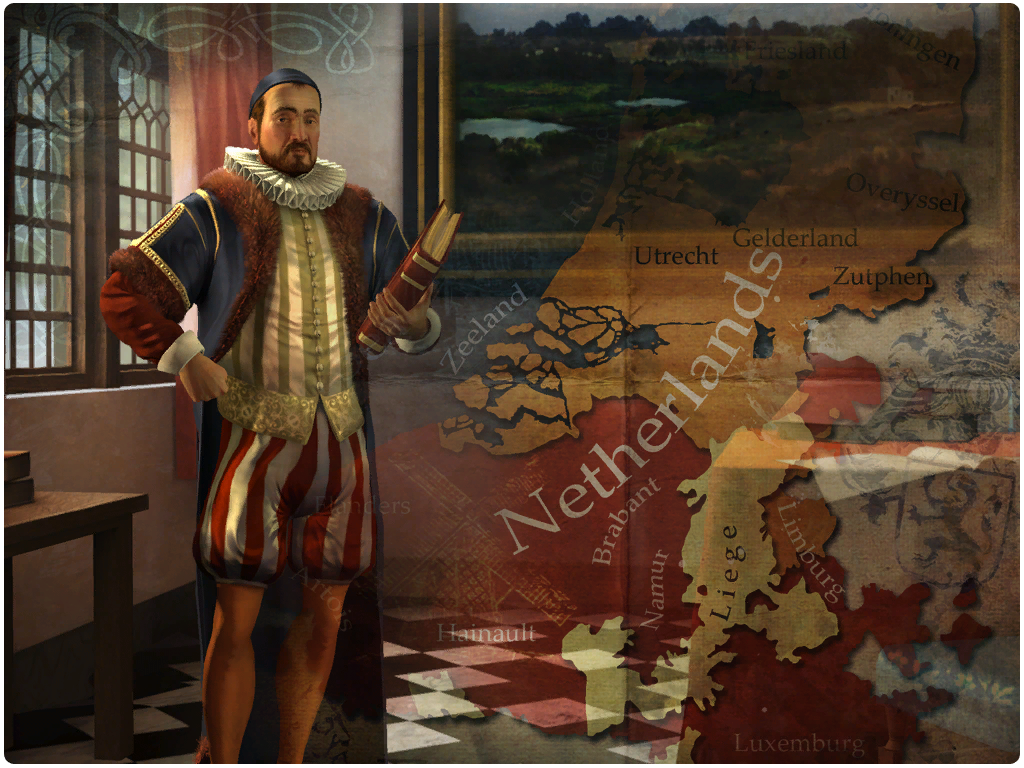
Now when we talk about The Netherlands’ way into the Renaissance, we’re not talking about one nations struggle in difficult times – we’re talking about one nation emerging over the course of the middle ages. Well at least in this regard it’s more or less correct that you’ll start as any game of Civilization with only your capital, Amsterdam.
In the middle ages the Low Countries (Neder-landen in contemporary Dutch documents, thus The Netherlands) were a region of emerging cities and city states. Always subject to be ruled by the grand European monarchies of the time, The Netherlands only slowly started identifying themselves as belonging together under Burgundian rule. The Burgundians were the first to consider the Dutch trading interest, which lead to an economic boom in the entire region.
When The Netherlands became subjects of the Holy Roman Emperor all fiefs in the region of present day Netherlands and Belgium were united to form the Seventeen Provinces. Unfortunately when Philip II., son of Charles V., took the throne tensions became unbearable. Power was more and more centralized – of course not in The Netherlands.  Protestantism had spread to the region and was rigorously suppressed. And worst of all: Taxation of the wealthy region increased to fund the Empires wars against France and Protestant German princes, amongst them some important trading partners. Eventually in 1568 the Dutch Revolt (Eighty Years’ War) broke out, resulting in de facto independence of the northern provinces.
In this scenario you’ll play William I of Orange, one of the most influential noblemen of The Netherlands and leader of the Dutch Revolt. Born of House of Nassau and becoming Prince of Orange he basically founded the House of Orange-Nassau, which still is the reigning monarchy of The Netherlands. To keep it short, I won’t go into detail on his interesting upbringing and due to the complexity also only briefly summarize the Dutch Revolt:
The Rebellion was defeated several times, but never completely. Turning tides in battles, trade blockades / embargos and support by foreign and domestic allies lead to a long struggle for power in the provinces. Eventually the North stabilized, reigned by rebels, whilst the South became a Spanish/Habsburgian stronghold. The Peace of Westphalia (1648, half a century after the end of the scenario) ended several wars on European soil. Amongst others it ended the Eigthy Years’ War and established The Netherlands as an independent nation.
Into the Renaissance – Netherlands Strategy (Deity)
Prologue: The Netherlands Unique Traits & Happiness
The Dutch trait “Dutch East India Company” retains 50% of the Happiness benefits from a Luxury Resource if your last copy of it is traded away. Especially in the beginning you will (should!) make heavy use of this:
Trade 1 Luxury resource (+4 Happiness) with one neighbor for Luxury resource 2 (+4 Happiness) will result in 6 Happiness for you. Alternatively you can always trade resources for Gold and GPT, whilst retaining half of your resources Happiness bonuses.
| Sea Beggar | Polder (Unique Improvement) |
|---|---|
| The Dutch Sea Beggars replace Privateers. They are very powerful, starting with the 2nd Level Coastal Raider promotion (remember: Level 3 leads to Logistics granting a 2nd attack per turn) and the supply promotion allowing them to heal outside friendly territory.
Unfortunately you’ll only get those in the very very late game, so the bonus provided is not a significant one. |
The Polder grants marshes +3 Food and another +1 Production and +2 Gold with Economics. Also creating it doesn’t remove the marsh, thus providing a defensive advantage.
Again: Unfortunately there aren’t many marshes in the Dutch region in this scenario, as you can see on the Into the Renaissance map, so again this unique trait doesn’t help you much. |
Altogether the Dutch unique traits are quite poor. At least the Happiness / Gold bonus from the “Dutch East India Company” helps a lot surviving the early game and thus puts you in a good position to win the end game.
Part 1: Settle as much of present day Germany as possible
Chapter 1: Settling Central Europe – Containing Austria and securing Wittenberg
Your biggest enemy in the early game is Austria. Not only do they “buy” (marry) City States with their unique ability, but they also settle Germany pretty quickly. Even worse: Even behind Vienna they have plenty of land to settle to create a gigantic empire in no time. To prevent this, just like playing Spain or France you have to settle strategically immediately:
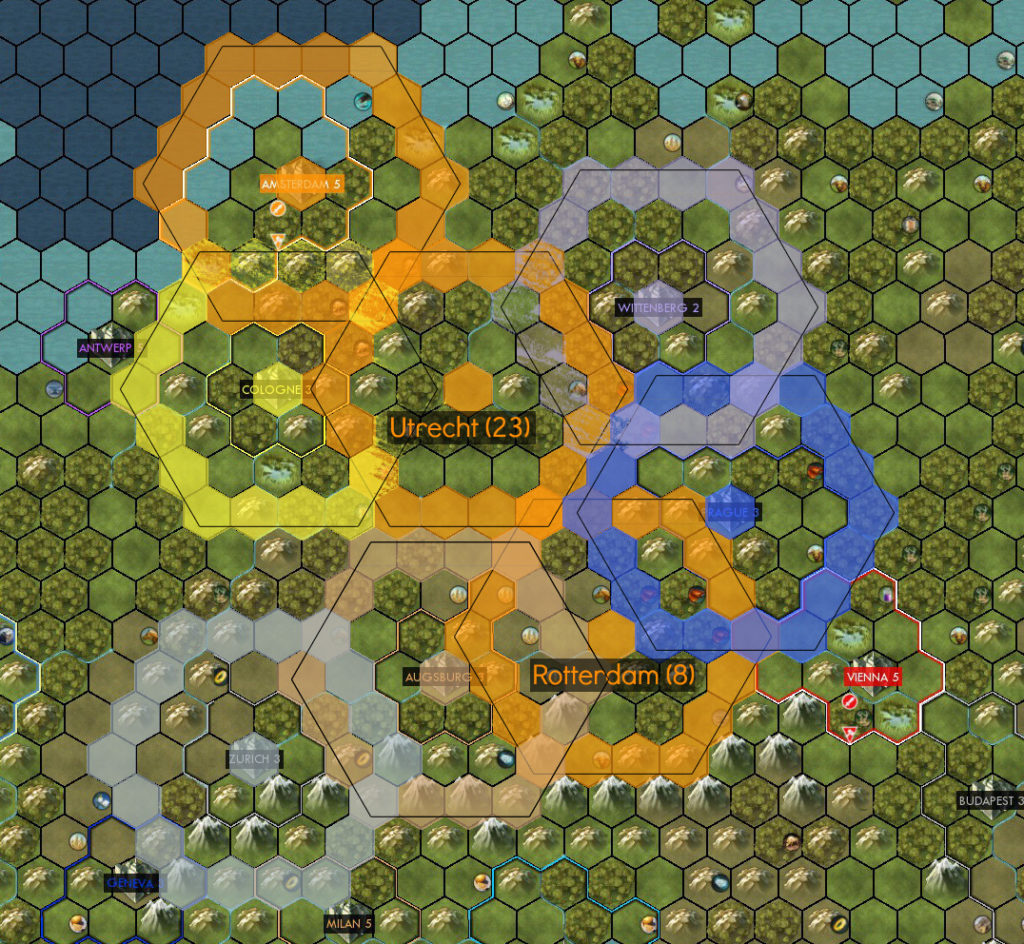
As you can see above, the city states already (theoretically) cover big areas of central Europe. Unfortunately Austria will cover the little land between them if you don’t do it. Don’t allow them even one city there! Here are some pictures from my first failed Deity attempts doing that:


Founding Rotterdam right there in Bavaria denies Austria the fertile and productive land west of Vienna. Filling the gap with Utrecht secures your supply line to the front. Also it puts you in a good position to capture Wittenberg in order to spread Protestantism later!


Chapter 2: Initial Build Order and Social Policies
Without immediately going for Liberty the above settling strategy wouldn’t work. You’ll need the free settler immediately. The ability to build more settlers faster is a mere side effect as you won’t build more than one (or 2). Going for Honor quickly after that is required to deal with Austria.
- Liberty
- Republic – +production in cities
- Collective Rule – for a free settler plus bonus on producing settlers
- Tradition – (turn 6) for more culture in your capital
- Legalism – (turn 19) for 4 free culture buildings in your first cities
- Citizenship – for a free worker and faster improvements
- Honor – (turn 37)
- Warrior Code – (turn 49) for an early General +production bonus on melee units
- Military Tradition – for +50% XP for all units, which you need early to grow a huge number of veterans.
- Discipline – +15% bonus for melees flanking each other
- Military Caste – Happiness and Culture from city garrisons
- Professional Army – Happiness from defense structures and decreased upgrade costs
The above is the social policy part for the first half of the game. In the second half, I headed for Meritocracy (119), Commerce (133), Trade Unions (146), Mercantilism and Protectionism (176), bringing me up to +50 Happiness again.
The initial build order shows quite clearly the early focus on military units to cope with the Austrian threat. Also in several attempts I realized: The less units you build – the earlier Austria will attack. They will grow stronger no matter, but as you’ll mainly fortify your units in defensive spots in your (friendly) territory, every unit of yours is precious!
| Amsterdam | Rotterdam (turn 8) |
Utrecht (turn 23) |
|---|---|---|
| 1. Barracks (6) | — | — |
| 2. Worker (5 turns -> 11) | 1. Worker (9 turns -> 17) | — |
| 3. Settler (11 turns -> 22, founding Utrecht turn 23) | — | |
| 4. Workboat (3 turns -> 25) | 2. Watermill (9 turns -> 26) | — |
| 5. Spearman (3 turns -> 28) | — | — |
| 6. Spearman (3 turns -> 31) | 3. Walls (4 turns -> 30) | 1. Worker (10 turns -> 32) |
| 7. Composite Bowman (3 turns -> 34) | 4. Composite Bowman (5 turns -> 35) | 2. Composite Bowman (8 turns -> 40) |
| Units | Units | Units |
| Circus (43-46) | Circus (45-51) | Watermill (44-48) |
| Pikeman (51-56) | Stable (46-50) | |
| Market (56-62) | Mint (50-54) | Composite Bowman (48-57) |
| Pikeman (54-60) | ||
| Library (62-65) | Colosseum (60-65) | |
| Composite Bowman (65-69) | Composite Bowman (65-68) | Mint (57-66) |
| Barracks (69-75) | National Treasury (68-76) | Library (66-75) |
| Temple (75-81) | National College (76-86) | Temple (75-81) |
| Workshop (81-87) | Workshop (86-90) | Workshop (81-87) |
| Stable (87-91) | National Epic (90-98) | Colosseum (87-92) |
| Forge (91-96) | Catapult | Aqueduct (92-97) |
| Units | Units | Units |
Infrastructure and Movements
Your initial settler immediately moves to the spot for Rotterdam. Meanwhile the worker does the same – building a road on every tile and turn all the way towards Rotterdam. Without this road, your mobility is seriously limited.
You will find that even later in the game: Having lots of roads (which are a strain of your economy), helps you navigate your units across more tiles and this increased velocity is a great way to save your units!!!
Research
Early research playing as The Netherlands is directed at improving military and economy feats quickly. Civil Service is a logical first step. Then, getting “Guilds” makes your life easier, with Pikemen defending.
- Civil Service (turn 39)
- Guilds (turn 66)
Research Agreement with England signed turn 69! - Metal Casting (turn 81 for Workshops)
- Theology (turn 93)
- Machinery (turn 108)
- Physics (turn 138)
- Chivalry (stolen turn 141)
- Steel (turn 148)
- Gunpowder (turn 153)
- Metallurgy (turn 158)
- Finish University of Oxford: Chemistry (for cannons, turn 159)
- Banking (turn 163)
- Humanism (turn 167)
- Compass (turn 170)
- Astronomy (turn 173)
- Printing Press (stolen turn 176)
- Exploration
- Navigation
Chapter 3: Stabilizing and Defending against Austria
Austria declared war on me in turn 33, ~1200AD. Unfortunately soon after they bribed France against me, too (turn 35). In most of my games (with France, Austria and the Netherlands) England founds a city in central Europe, most likely Warwick. This is great because it blocks the French army. So even though you’ve got a powerful enemy in the West, you don’t have to worry about much.


Austria on the other side will come at you through both your direct border and via allied City States. Build roads, defend and only attack if you’re not at risk losing your unit. This way you should be able to defend against Austria.
City State alliances will be different each game. If you’re lucky you won’t wage war against everyone around you. During most of the early war with Austria I only had to fight off some of the City States:
- Wittenberg (allied with France)
- Prague (allied with Austria)
- Augsburg (peace)
- Cologne (peace)
- Antwerp (peace)
This was fortunate, especially since Wittenberg and Prague are at the top of the shopping list anyways. Use your first Great Generals (#3 and #4) to build Citadels at Wittenberg and Prague. Take care to always keep General #1 and #2 near your armies for the important +15% combat bonus.


Part 2: A United Protestant Central Europe!
Chapter 4: Wittenberg and Prague
Religious pressure emanating from Wittenberg is tremendous at the start. If the city remains surrounded by Catholic nations though: It will cease to spread Protestantism. That’s why it’s important to conquer Wittenberg first. Making peace with Austria is not necessary (even if Wittenberg is allied with Austria) but it helps easing pressure from your eastern front. Now you can focus on Wittenberg. Produce several catapults as you might lose one each turn.


The phase between turn 100 and 110 is important for the game: Other nations will have gained a technological advantage on you and will score exploration points (in my game France with 500, 400, 300 and the Celts 200, 100 until turn 160). Russia starts dominating eastern Europe and will conquer enemy cities. Protestant Reformation starts in Wittenberg and you’ll need to convert if you want to win the game.


Right after capturing Wittenberg (turn 108), turn on Prague. There are only a few hills from where to bombard it safely. Throw at it what you have, as Prague is the way to Vienna. I captured it in turn 116, scoring the first 400 Victory Points (VP).
Exactly 10 turns after we made peace, Austria declares war on me again. This time siding with England. This is actually a problem: The English fleet is much stronger than mine (zero ships) and actually threatened to capture Amsterdam. Privateers had brought Amsterdam to 50%, before enough Crossbowmen could destroy the English fleet.


Chapter 5: The Fall of Habsburg Austria
Now is your time. Now you’ll get revenge for ~120 turns of painful defense, micromanagement of all your units just to remain the status quo and dozens of insults and denouncements by the other European nations, Austria first of all.


Here’s the chronology of my conquest of Austria:
- 128 – Vienna, 21 population = 525 VP
- 135 – Graz, 20 population = 500 VP
- 139 – Klagenfurt, 14 population = 350 VP
- 141 – Zwettl, 7 population = 175 VP
- 145 – Villach, 14 population = 350 VP
- 146 – Innsbruck, 4 population = 100 VP
- 147 – Bregenz, 18 population = 450 VP


So overall the conquest of Austria playing the Netherlands on Deity granted 2450 VP. Beneficial was Russia declaring war on Austria in turn 134. From that point onwards the actual resistance was negligible.
Austria had asked for peace several times in between. First I got offered several cities I was close to capturing anyways – I declined! Then I got offered five cities mostly at the Adriatic Sea. Not a chance of holding these against Byzantium – so I declined again. The offer I took consisted of as much Gold per turn I could get plus Linz, one of Austria’s cities as the Adriatic.


Part 3: Conquest of France and The Orthodox East
Chapter 6: Russia – The last Challenge
Immediately after making peace with Austria (removing them as buffer) Russia declared war on me. Not only that: Russia used Great Generals to advance with Citadels quite deep into my new territory. One such insult I suffered – the second I prevented by attacking Russia.


Here’s the short version and the victory points I scored. The following “chapters” are a mere slideshow of the conquests, as tactics have been explained in various other Into the Renaissance blog posts.
- 151 – declared war on Sweden and Warsaw
- 151 – declared war on Russia
- 163 – Golden Age
- 165 – Cologne (Protestant, so no VP)
- 167 – Warsaw, 20 population = 500 VP
- 172 – Warwick, 13 population = 325 VP
- 173 – St. Polten, 12 population = 300 VP
- 177 – Augsburg, 16 population = 400 VP
- 177 – Gdansk, 17 population = 425 VP
- 180 – Tula, 16 population = 400 VP
- 180 – peace with Sweden


- 182 – peace with Russia for 2500 Gold
- 182 – peace with Spain for 7500 Gold
- 182 – declared war on Byzantium
- 186 – Kitzbuhel, 20 population = 500 VP
- 187 – Budapest, 20 population = 500 VP
- 194 – Samosata, 16 population = 400 VP
- 195 – Sardica, 18 population = 450 VP
- 199 – Ani, 19 population = 475 VP


Chapter 7: France
Shortly after declaring war on France the Social policies adopted lead to an overall Happiness score of +64, which resulted in frequent Golden Ages (the next one starting turn 183).


- 179 – declared war on France
- 180 – Antwerp, 13 population = 325 VP, liberated, but it still joined France – another 125 VP for recapturing
- 183 – Dijon, 11 population = 275 VP
- 186 – Venice, 19 population = 475 VP
- 188 – Lyon, 18 population = 450 VP
- 191 – Zurich, 21 population = 525 VP
- 195 – Tours, 10 population = 250 VP
- 197 – Florence, 15 population = 375 VP
- 198 – Geneva, 6 population = 150 VP


Chapter 8: Winning the Game
Several more factors contributed to a successful game:
- Research Printing Press as late as possible. Otherwise Protestantism will spread faster than you can conquer cities. You’ll need Catholic cities to score Victory Points.
- Use your enormous Gold per Turn income to buy Sea Beggars in the Adriatic every turn – a great way to capture cities there.
- I chose the ideology Autocracy and between turn 194 and turn 199 captured 6 cities. This granted an additional 1420 culture!


The conquests listed in Part 3 were worth 7625 VP. Those plus the 2450 VP from capturing Austria makes 10075 VP. Together with what I got for population, research and social policies, I ended up with an amazing 13000 Victory Points!!!


At turn 200, on winning the game I controlled 7 Great Generals, with a progress for the eighth General of 996 / 2700 XP. A direct score of 13.016 and a normalized score of 19.721 earned me another Augustus Caesar ranking!
Into the Renaissance Netherlands (Deity) – Conclusion


The Netherlands were (or will have been) the 2nd last game of the Into the Renaissance Scenario. As with plenty of the other nations it took more than one attempt. I hope this guide helped avoid the pitfalls I fell victim to at the start.
I hope you’ll have a lot of fun playing the Dutch, maybe even beyond victory. What fun it would be to capture the British Islands with a fleet of Sea Beggars. Or start ruling the Mediterranean immediately from the base in the Adriatic.
Anyways: Overcoming the first hurdles, playing the Into the Renaissance Netherlands was good fun and challenging until the end!
Hi, great guide, but when does protestantism appeared in your game? Do you conquer Wittenberg before or after? I’m 158 turns in and still no protestantism… Any clue?
Woah, that sounds very very late. Is Wittenberg still free? Maybe the religious pressure by Austrian Catholicism is too strong. If that happens, there’s not much you can do, but reload…